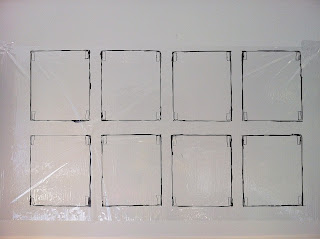
So I got a group of botanical framed art for the shop... I have no level and what a daunting task to measure the wall... blah, blah, blah..! I was going to make a paper template of the frames, as most people do, but the light bulb went off! I'm a florist, so of course I always have cellophane in the shop. The cellophane was shining like a bright light upon me.. and voila... the daunting task became the easiest installation ever!
Here's how simple it is;
Materials Needed:
-Cellophane
- Large chisel tip Sharpie
- X-acto knife
- Picture hanging strips (Command Brand)
TIP: Make sure you buy the appropriate strip to support the size of your frame.
Ready, Set, Go!
1. lay out all your artwork on the floor the way you would like it to appear on the wall.
2. Measure the space between and above each frame. I measured them 2" apart from each other and 3" above each other.
3. Tear a sheet a clear cellophane and lay it on top of the grouping. This was approximately 36" wide.
4. Trace the outside of the frame onto the Cello and draw little rectangles the size of the hanging strips on each corner. TIP: Do this carefully...You don't want to frames to shift.
5. Position the cello template on the wall. What's great about this is that the cello creates static on the wall, so the paper just sticks right where you want it! Put little pieces of tape on each corner to avoid shifting anyway.
6. Take a step back to make sure everything looks good..:)
7. Carefully score the rectangles on each corner with your X-acto knife, making little tab openings. TIP: Make sure your blade is sharp so not to press on the wall too hard. Hold the paper with one hand so that the paper doesn't move while cutting.

8. Create openings large enough to position the strips at each corner. NOTE: You will also position the strips to the back of each frame as shown on the cello cut outs. Place all of the strips in the cut outs and stick. Now you're ready to pull of the cello off the wall.

9. Position the top corners of the back of the frames to match up to the strips on the wall and push firmly to secure. Done!
Enjoy!


No comments:
Post a Comment